Help Center
- Sign in / Join Sookshmas
- Account Settings
- Advance Settings
- Profile
- Wall
- Questions
- e-Notes
- Calculations
- MCQs
- Favorites
- Marked
- Gallery
- Find Profiles/User
- Analytics
- Messages
- Equations
- Post Basics
- Tags
- Score Weightages
- Levels
- Play Quiz
- Beyond Knowing Subscription
- Test Series
- Videos
- Assignments
- Quiz Set
Sookshmas Account
Join Sookshmas
To create Sookshmas account, go to www.sookshmas.com.
- Click Join Sookshmas menu at header.
- Enter Username, Email/Mobile number and Password.
- Click Registerbutton.
or
- Click Sign in menu at header.
- Click "Create an account" link in the bottom .
- Enter Username, Email/Mobile number and Password.
- Click Register button.
If you registered through email, you will get the verification link in given email address. Click on verification link to verify your email address.
If you registered through mobile number, you will get the verification link in given mobile number. Click on verification link to verify your mobile number.
Login
To login into your Sookshmas account, go to www.sookshmas.com.
- Click Sign in menu at header.
- Enter your registered Email or Mobile number and Password.
- Click Sign in button.
Forgot Password
In case you forgot your password, go to login page click Forgot Password link at bottom. You will be redirected to Forgot Password page.
- Enter the Email/Mobile number and click Submit button. You will get the verification link in given email address/mobile number.
- Click the verification link. Enter the new password and click Submit button.
Log in with your email address and new password. You can change your password after login.
Account Settings
Your profile describes you and set the content of your account. To update your profile, first login to your account then click down arrow icon in the top right corner of your screen and select Account Settings.
Account Details
To edit your account details:
- Click on edit icon in the right corner of Account Details section.
- Enter the Personal and Contact details in respective section.
- Enter Account Tags and Profile Tags in Tags section and enable the Strict mode as per your choice.You can also request a new tag by clicking on Request New Tag link.
- Click Update button.
Strict Mode: If you turn on Strict mode, only posts containing all your Account Tags(with or without other tags) will be visible to you. If you turn off Strict mode, posts containing atleast one of your Account Tags(with or without other tags) will be visible to you.
Mobile Verification
If your mobile number is not verified, you can verify it by clicking Send OTP button.You will recieve an OTP in given mobile number. Enter that OTP and click Verify. If in case you wish to change your mobile number after registration, click on Change mobile number, update your mobile number and click Send OTP. You will recieve an OTP in your entered mobile number.Enter that OTP and click Verify.Click Update button to update mobile number.
Email Verification
If your email is not verified, you can verify it by clicking Send OTP button.You will recieve an OTP in given email. Enter that OTP and click Verify. If you have not entered email while registration, you can update it and verify. Click Update button to update your email.
Password
To change your account's password:
- Click on edit icon in the right corner of Password section.
- Enter your Current Password and New Password.
- Click Change Password button.
You will get the notification in your email address about new password.
Profile picture and About
To add or change your profile picture or about information:
- Click on edit icon in the right corner of About section.
- Click Choose File and select the picture.
- Crop your photo and click Apply button.
- Enter the introduction about you in description box and Click Update About button.
Advance Settings
To do Advance Settings, first login to your account then click down arrow icon in the top right corner of your screen and select Account Settings and click on Advance Settings button.
Blocked Accounts
The list of blocked accounts can be seen here. If you block any account, then that user cannot do any activities (Clap, Flag, Edit, Delete, Comment, Reply, Suggestion) on your post.
To Block the account:
- Click on icon in the author's Profile and choose Block Activities.
To UnBlock the account:
- Click on icon in the author's Profile and choose UnBlock Activities or Click UnBlock in Advance Settings.
Blocked Follow Requests
The list of blocked users can be seen here. If the user is blocked (when the follow request is sent), then the user cannot be able to send the follow request again until the user is unblocked.
To Block the user:
- Click on Block button in Profile's Follow Requests block.
To UnBlock the user:
- Click on icon in the author's Profile and choose UnBlock Request or Click UnBlock in Advance Settings.
Deactivate Account
To deactivate your account:
- Click the Deactivate account link.
- Enter your password and click Ok.
On deactivating account, your profile will be hidden from other users. You can reactivate your account anytime by logging in.
Set wait time for MCQs
If you set the wait time for MCQs, then the user cannot be able to check the correct option until the wait time is completed.
To set wait time for MCQs:
- Click on edit icon.
- Enter the time and click Save.
Set Post/Edit/Delete permissions for followers
- Click on symbol and click edit .
- Select the followers from dropdown for posting/editing/deleting on behalf of you and click Save.
Posting/Editing/Deleting on behalf of author
To post on behalf of author:
- Click on Add button on top right corner of the page. Choose the respective option.
- Select the authors from dropdown in modal box to post on behalf of them.
- Fill the necessary information and post.
To edit post on behalf of author:
- Go to the author's post and click on edit icon to edit that post.
To delete post on behalf of author:
- Go to the author's post and click on delete icon to delete that post.
Profile
Profile is the area where you can track all your activities. Here you will see your score and the no. of questions, e-Notes, calculations, MCQs, comments/replies done by you and no. of quizzes played. It also keeps track of the views and claps done on your posts and also the no. of followers and following. There will also be a Follow button when you are in other user's Profile. You can click this to send the follow request if you want to track there posts. Once they approve your follow request, you'll begin to see their posts appear in your Wall. Apart from that it contains the following modules:
- About
- Account Tags
- Profile Tags
- Follow Requests
- Followers
- Following
About:
About module contains the information about the user.
Account Tags:
It will show the list of account tags of your profile which are responsible for setting the content of your account.
Profile Tags:
It will show the list of profile tags of your profile which includes your skills or other professional information.
Follow Requests:
This module contains the follow requests sent by other users with Approve and Remove button. If you approve the request then the user will be able to see your posts on their wall. If you remove the request then the user will not be able to see your posts on their wall.
Followers:
This module contains the list of users who are following you. If you don't want the user to follow you, you can remove that user by clicking on Remove button.
Following:
This module contains the list of users whom you are following.
In addition to this, Profile is having top menu bar which provides links to Wall, Questions, e-Notes, Calculations, MCQ, Favorites, Marked, Gallery, Find Profiles,Analytics,Messages and Equations.
Wall
Wall contains recent posts done by the authors and the posts shared by the authors whom you are following. It also contains the posts done by Followers. It will show the posts based on your Account tags. To see your Wall posts, click on Wall menu on your Profile. On Profile, there are two options, Followers and Following.By default, Following is enabled.The posts related to whom you are following will be visible. You can switch to Followers to see the posts done by the Followers.
For example, suppose your account tag is JAVA and you are following Mr. ABC. So, all the post that Mr. ABC is posting with post tag JAVA and the posts shared by Mr. ABC will be visible in your wall. Rest other post of Mr. ABC with different tags will not display. Similarly,all the posts done by the Followers will also be visible who are having same account tags as yours.
Questions
It is a healthy interaction section in the Sookshmas. If you have any doubts, you can post questions and can get answer through discussions. It includes the list of questions(titles) with link on them and clicking that link allows you to show that question.
Post the Question
There are two ways to post the question. You can either click on the Add button at header and select Post Question or go to Profile, click on Questions menu and then click Post Question button.
- Enter the title and appropriate tags.
- Select the type of visibility for the post from the dropdown given. By default Public is selected.
- Give the description of the question in content editor.
- Click on the Post Question button.
Edit/Delete the Question
Go to Questions menu. You can view the questions list. Click on the question title you want to edit/delete. It will open the Question with full details in a new page.
To edit the question:- Click on Edit icon .
- The Edit Question page gets displayed. You can edit the Question and visibility of post and click on Update Button.
- Click on Delete icon .
- It will ask you for the confirmation. Click "Yes" to delete it.
Clap/Flag the Question
If you like any Question you can Clap that Question by clicking on Clap icon .If the Question is not meaningful you can Flag that Question by clicking on Flag icon . You can also Clap/Flag the comment and reply.
Share the Question
Sharing is helpful to your followers. You can share Question post by clicking on Share button and that post will be visible in all your followers Wall either they are following that post author or not. You cannot share your own post.
Favorite
If you like any Question you can make that Question as favorite by clicking on favorite icon in post and that Question will be visible in your Favorites menu at menu bar.
e-Notes
e-Notes is a public library section in the� Sookshmas. In this section you can post articles, and share the knowledge or information with others. This helps to improve the knowledge of users who are keen to know about new things.
Steps to post the e-Note
There are two ways to post the e-Note. You can either click on the Add button at header and select Post e-Note or go to Profile, click on e-Notes menu and then click Post e-Note button.
- Enter the title.
- Add relevant tags (to help users to find your article in the future). Type the tag name, you will get the suggestions. Select tag from suggestion.
- Select the type of visibility for the post from the dropdown given. By default Public is selected.
- Add detailed information in the content editor.
- Click Post e-Note button.
Edit/Delete the e-Note
Go to e-Notes menu. You can view the e-Notes list. Click on the e-Note title you want to edit/delete. It will open the e-Note with full description in a new page.
To edit the e-Note:- Click on Edit icon .
- The Edit e-Note page gets displayed. You can edit the e-Note and visibility of post and click on Update Button.
- Click on Delete icon .
- It will ask you for the confirmation. Click "Yes" to delete it.
Clap/Flag the e-Note
If you like any e-Note you can Clap that e-Note by clicking on Clap icon .If the e-Note is not meaningful you can Flag that e-Note by clicking on Flag icon . You can also Clap/Flag the comment and reply.
Share the e-Note
Sharing is helpful to your followers. You can share e-Note by clicking on Share button and that post will be visible in all your followers Wall either they are following that post author or not. You cannot share your own post.
Favorite
If you like any e-Note you can make that e-Note as favorite by clicking on favorite icon in post and that e-Note will be visible in your Favorites menu at menu bar.
Calculations
You can post your calculations or equations which are needed often. It will be available online for your further usage so that you can get the results by giving only parameters without memorizing the lengthy equations which saves your time.
Steps to post the Calculation:
There are two ways to post the calculation. You can either click on the Add button at header and select Post Calculation or go to Profile, click on Calculations menu and then click Post Calculation button.
- Enter the formula name.
- Add appropriate tags.
- Select the type of visibility for the post from the dropdown given. By default Public is selected.
- Write your formula in content editor by using fx icon.
- Click Post Calculation button.
Edit/Delete the Calculation:
Go to Calculations menu. You can view the Calculation list.Click on the Calculation title you want to edit/delete. It will open the Calculation with full description in a new page
To edit the Calculation- Click on Edit icon .
- The Edit Calculation page gets displayed. You can edit the Calculation and visibility of post and click on Update Button.
- Click on Delete icon .
- It will ask you for the confirmation. Click "Yes" to delete it.
Clap/Flag the Calculation
If you like any Calculation you can Clap that Calculation by clicking on Clap icon .If the Calculation is not meaningful you can Flag that Calculation by clicking on Flag icon . You can also Clap/Flag the comment and reply.
Share the Calculations
Sharing is helpful to your followers. You can share Calculations post by clicking on Share button and that post will be visible in all your followers Wall either they are following that post author or not. You cannot share your own post.
Favorite
If you like any Calculations you can make that Calculations as favorite by clicking on favorite icon in post and that Calculations will be visible in your Favorites menu at menu bar.
MCQs
It is the practicing section of Sookshmas. You can post a question by giving four options with the valid answer which help others in improving knowledge and preparing competitive exams.
Steps to post the MCQ
There are two ways to post MCQ. You can either click on the Add button at header and select Post MCQ or go to Profile, click on Post MCQ menu and then click Post MCQ button.
- Write the question with options and add appropriate tags.
- Select the type of visibility for the post from the dropdown given. By default Public is selected.
- Mark the valid answer and click on Submit MCQ button.
Edit/Delete the MCQ
Go to MCQs menu. You can view the MCQs list.Click on the MCQ title you want to edit/delete. It will open the MCQ with full description in a new page
To edit the MCQ- Click on Edit icon .
- The Edit MCQ page gets displayed. You can edit the MCQ and visibility of post and click on Update Button.
- Click on Delete icon .
- It will ask you for the confirmation. Click "Yes" to delete it.
Clap/Flag the MCQ
If you like any MCQ you can Clap that MCQ by clicking on Clap icon .If the MCQ is not meaningful you can Flag that MCQ by clicking on Flag icon . You can also Clap/Flag the comment and reply.
Share the MCQ
Sharing is helpful to your followers. You can share MCQ post by clicking on Share button and that post will be visible in all your followers Wall either they are following that post author or not. You cannot share your own post.
Favorite
If you like any MCQ you can make that MCQ as favorite by clicking on favorite icon in post and that MCQ will be visible in your Favorites menu at menu bar.
Favorites
If you like any post or the post which is useful for future, you can make that post as favorite by clicking on favorite icon in post and that post will be visible in your Favorites menu at menu bar.
In Favorites menu, you can see your favorite posts and also Favorite Tag Combination. On clicking any of your Favorite Tag Combination, you can see the posts related to that tag combination.
Marked
Marked section contains the posts which are flagged by others. Your posts can be flagged if it is:
- Off-topic
- an Advertisement or Spam
- Abusive
- Breached Content Policy
Gallery
Gallery is like an album, where you can save all your images.
Steps to upload an image:
- Go to your Profile, click on the Gallery menu.
- Browse the image from the system, give caption (optional) and click on Upload button.
Delete/Copy the image link:
- If you want to remove any image from Gallery, you can just click on the Delete icon . It will ask you for the confirmation. Click "Yes" to delete it.
- To use these images in the posts, click on the Copy Link icon to copy the URL of the particular image.
Find Profiles/User
It allows you to search other users. You can restrict your search to specific category of users by mentioning tag name. For example: If you are mentioning HTML5 in Tags field, you will get the list of users who are interested in HTML5 (i.e. either their account or profile tags is "HTML5"). You can view user's profile or follow them by opening their profile.
Steps to Find Profiles:
- Go to your Profile, click on the Find Profiles menu.
- Enter the name or city or tag to find any author.
- Then click on Search button to get the list of authors.
Analytics
It is the area where you can track the records like Score, Claps and Flags of your posts, comments and reply by clicking on the Analytics menu at the menu bar. By using filters you can filter the data. Here you can also see the track of account tags being changed.
Analytics Includes:- Summary
- Questions
- e-Notes
- Calculations
- MCQs
- Post
- Comments
- Reply
- Play Quiz
- Quiz Exam Result
- Quiz Challenge Result
- User Warning
- Higher Level Warning
- Tags Track
Summary:
In Summary you can see overall Score, Claps and Flags which you got for your post, comment and reply. You can also see overall Score, Claps and Flags for the particular post types like Questions, e-Notes, Calculations and MCQs.
Questions:
Here you can see the no. of Post, Comment and Reply which you have done in Questions and also the Claps, Flags and Score which you got for that Post, Comment and Reply. You can use the filters to get the result for the particular Tag and Date.
e-Notes:
Here you can see the no. of Post, Comment and Reply which you have done in e-Notes and also the Claps, Flags and Score for that Post, Comment and Reply. You can use the filters to get the result for the particular Tag and Date.
Calculations:
Here you can see the no. of Post, Comment and Reply which you have done in Calculations and also the Claps, Flags and Score for that Post, Comment and Reply. You can use the filters to get the result for the particular Tag and Date.
MCQs:
Here you can see the no. of Post, Comment and Reply which you have done in MCQ and also the Claps, Flags and Score for that Post, Comment and Reply. You can use the filters to get the result for the particular Tag and Date.
Post:
Here you can see your posts and can get the result by setting the Post Type or Tags or Date.
Comments:
Here you can see your Comments and can get the result by setting the Comment Type or Tags or Date.
Reply:
Here you can see your Reply and can get the result by setting the Reply Type or Tags or Date.
Play Quiz
Here you can track your played quiz with tags, score, time taken and the date of the particular quiz. Also, on clicking particular tag, you can see the MCQs and answers with correct and wrong answers.
Quiz Exam Result
Here the Examiner can track the results of their students .
Quiz Challenge Result
Here you can track your friend's results whom you have challenged.
User Warning
Here you can track all your warnings which you got.
Higher level Warning
Here the higher level user can track all the warnings of lower level user.
Tags Track:
Here you can track your changed account tags.
Filters
Post Type:This filter has 4 types - Question, e-Note, Calculation and MCQ. Data will come based on the type you set.
Tags:
Data will come based on the tag combination you set.
Date:
In this filter you can set the date as day, week, month, year and date range. Data will come based on that value.
Messages
In this section you can track all messages which you got for your post, comment or reply. It has mainly 3 sections:
- Suggestion
- Reply
- Deletion
Suggestion:
Suggestion can be sent only to the posts by the higher level rank users.Those Suggestion messages will be visible in the Suggestion section of Messages for the post owner.
There will be reply and delete symbols beside every Suggestion messages where the post owner can reply to that suggestion and delete if necessary respectively.
Reply:
The reply sent by the post owner will be visible in the Reply section of Messages for the suggested user.
Deletion:
Deletion is further divided into 3 sections:
- Post Deletion
- Comment Deletion
- Reply Deletion
Post Deletion: The deleted post by the higher rank will be visible in the Post Deletion section with the reason for deletion. There will be delete symbol beside the reason where you can delete that message if necessary. Comment Deletion: The deleted comment by the higher rank will be visible in the Comment Deletion section with the reason for deletion. There will be delete symbol beside the reason where you can delete that message if necessary. Reply Deletion: The deleted reply by the higher rank will be visible in the Reply Deletion section with the reason for deletion. There will be delete symbol beside the reason where you can delete that message if necessary.
Equations
It is an easy calculator customised to serve a particular equation given as input by the user.Users can type equations only once and can save them for reuse.
Create the Equation
- Go to Profile, click on Equations menu.
- Enter Title and Equation. Click on Render Equation.fx can be used to create equations which provides an easy and interactive experience.
- Find the output and click Save Equation.
Edit/Delete the Equation
Go to Equations menu. Click on sidebar and select the equation which you want to edit/delete.
To edit the Equation:- Click on Edit icon .
- The Edit Equation page gets displayed. You can edit the Title and Equation and click on Render Equation Button.
- Find the output and click Update Equation.
- Click on Delete icon .
- It will ask you for the confirmation. Click "Yes" to delete it.
Add Equation to calculation post
Go to Equations menu. Click on sidebar and select the equation which you want to post.Copy Equation id and enter that id while posting calculation.
Remove Equation from calculation post
There are two ways for removing equation block from calculation post:
Post Basics
Insert YouTube video in post
To insert the video in your post, first you need to take either the embed code or the URL of the YouTube video.
- Click on the YouTube button
 in content editor.
 - A window called Embed YouTube Video will appear.
- Enter the embed code in the field marked Paste Embed Code Here or enter the YouTube video URL in the field marked Paste YouTube Video URL and click OK.
- Open the YouTube video you want to share, click Share link

- Click Embed link. You will get the embed code.

- Copy that code and paste it in your Paste Embed Code Here field .
- Open the YouTube video you want to share.
- Either take the URL from URL bar or right click on the YouTube video and select Copy video URL
Insert image in a post
To insert image in a post, click image button  in content editor. It will open the Image Properties. Enter the image(web image or your gallery image) path in the URL field.
Comment on a post
If you like to share your views on e-Note, Calculation or you want to answer any question, then you can leave a comment for that post. To comment on a post go to the end of that post, there you will find a content editor. Write the comment and click Post Comment.
Reply to the comment
If you like to leave a reply on any comment, click the reply icon on right side of the comment. Then write the reply in a content editor below and click Reply.
Post the code snippet
To add the code snippet in your post select the code, click Styles button of content editor then select Special Container.
Post an equation
- Click the fx button on the content editor toolbar. It will open the Equation Editor which provides a toolbar with common mathematical operators and symbols to help write equations using the LaTeX markup.
- Create your equation using the toolbar.
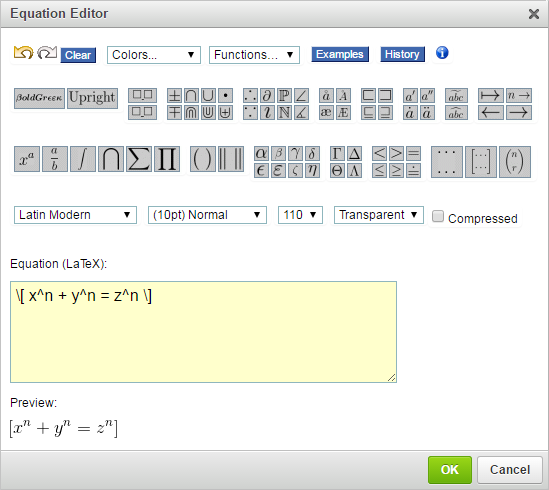
- Select 'Ok'.
Search the posts
You can search the post based on the tag name, title of the post or name of the author.
To search the post:
- Go to the Search option on the top of the website where you can search for users, posts or events.
- Type the keywords and you'll see the list of results. You can also combine keywords together like user name and tags to get more specific (eg: User did posts with CSS3 tag).
Posts visibility
Sookshmas provides three kinds of visibility modes for posts of site users.
- Public Mode: If you select Public mode while doing post, those posts can available in Play Quiz module of the site, can accessed by all site visitors and also be listed under organic results of all major search engine.
- Followers Mode: If you select Followers mode while doing post, those posts can be accessed by your followers and also available in Play Quiz module of the site.
- Only me Mode: If you select Only me mode while doing post, those posts can neither be accessed by other users nor be available in Play Quiz module of the site. It can be accessed only by you.
Tags
There are 3 important tags in the Sookshmas:
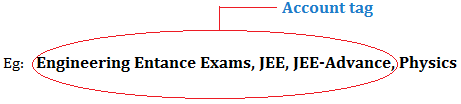
Account tag:
Account Tags are responsible for setting the content of your account. So only those posts having at least the tags same as of your Account tags will be visible to you.
Post tag:
Post tags are used during posting to categorize it so that it describes the topic of your post and makes your post easier to search.

Profile tag:
In Profile Tags you can enter your skills or other professional information which will help others to find you.
Eg: Java, Html
Following are the examples for Account tags :
Engineering Entrance Exams
Students who are preparing for Engineering Entrance Exams like JEE, IISER, NATA, COMEDK and CET etc, can set this tag as their account tag along with the specific exam tag (optional).
Eg:
-
Engineering Entrance Exams
-
Civil Services Entrance Exams, UPSC
-
Civil Services Entrance Exams, SSC(CGL)
Karnataka State Board
Users who are studying/teaching under 'Karnataka State Board' can set this tag as their account tag along with the specific class tag.
Eg:
-
Karnataka State Board, CLASS-VI
-
Karnataka State Board, CLASS-IX
-
Karnataka State Board, CLASS-X
CBSE
Users who are studying/teaching under 'CBSE' can set this tag as their account tag along with the specific class tag.
Eg:
-
CBSE, CLASS-VI
-
CBSE, CLASS-XI
-
CBSE, CLASS-X
Science and Nature
Users who are working, studying or doing research in the agriculture, veterinary, Medicine, Botany, Soil Science, Sericulture, Mineralogy and Environmental Science etc, can set this tag as their account tag along with their specific field (optional).
Eg:
-
Science and Nature
-
Science and Nature, Agriculture
-
Science and Nature, Veterinary
Secondary Education
Students who are pursuing the secondary education under any board (ICSE, CBSE, and State Board etc) can set this tag as their account tag along with their specific board.
Eg:
-
Secondary Education, ICSE
-
Secondary Education, CBSE
-
Secondary Education, KSEEB
Following are the examples for Post tags:
School Students/Teachers:
Following are the sample post tags. Students/teachers can use these tags while posting.
Board, CLASS, Medium (optional), Subject, Topic (optional)
Eg:
-
ICSE, CLASS XI, Social Science
-
CBSE, CLASS VIII, Mathematics
-
Karnataka State Board, CLASS IX, Science
JEE:
Following are the sample post tags for the JEE users. They can use these tags while posting.
Engineering Entrance Exams, JEE, JEE-Main/Advance, Subject, Topic (optional)
Eg:
-
Engineering Entrance Exams, JEE, JEE-Main, Biology
-
Engineering Entrance Exams, JEE, JEE-Advance, Physics
-
Engineering Entrance Exams, JEE, JEE-Main, Maths
Civil Service Entrance Exams:
Following are the sample post tags for the Civil Service Entrance Exams users. They can use these tags while posting.
Civil Service Entrance Exams, UPSC/SSC(CGL), Subject, Topic (optional)
Eg:
-
Civil Service Entrance Exams, UPSC, Hindi
-
Civil Service Entrance Exams, SSC(CGL), Science
Score Weightages
Clap and Flag Weightages are responsible for calculating scores. Each clap will lead you to gain some score while each flag will result in losing score which directly affect your main account score. So you have to be careful while posting the things. Make sure you post valuable or relevant data to increase your score.
Clap Weightage
The Clap Weightage Chart show the score that you will gain when someone claps or appreciate your content.
| Clap Weightages | e-Note | Question | MCQ | Calculation |
|---|---|---|---|---|
| Post | 7 | 1 | 2 | 10 |
| Comment | 2 | 2 | 2 | 2 |
| Reply | 1 | 1 | 1 | 1 |
- You will gain 7 score per clap on your e-Note.
- You will gain 2 score per clap on your comment done on any e-Note.
- You will gain 1 score per clap on your sub-comment done on any e-Note.
- You will gain 1 score per clap on your Question post.
- You will gain 2 score per clap on your comment done on any Question post.
- You will gain 1 score per clap on your sub-comment done on any Question post.
- You will gain 2 score per clap on your MCQ post.
- You will gain 2 score per clap on your comment done on any MCQ post.
- You will gain 1 score per clap on your sub-comment done on any MCQ post.
- You will gain 10 score per clap on your Calculation post.
- You will gain 2 score per clap on your comment done on any Calculation post.
- You will gain 1 score per clap on your sub-comment done on any Calculation post.
Flag Weightage
The Flag Weightage Chart show the score that you will lose when someone flags your content.
| Flag Weightages | e-Note | Question | MCQ | Calculation |
|---|---|---|---|---|
| Post | -7 | -1 | -2 | -10 |
| Comment | -2 | -2 | -2 | -2 |
| Reply | -1 | -1 | -1 | -1 |
- You will lose 7 score every time when a user flag your e-Note.
- You will lose 2 score when a user flag your comment that you have done on someone's e-Note.
- You will lose 1 score when a user flag your sub-comment that you have done on someone's e-Note.
- You will lose 1 score when a user flag your Question post.
- You will lose 2 score when a user flag your comment that you have done on someone's Question post.
- You will lose 1 score when a user flag your sub-comment that you have done on someone's Question post.
- You will lose 2 score when a user flag your MCQ post.
- You will lose 2 score when a user flag your comment that you have done on someone's MCQ post.
- You will lose 1 score when a user flag your sub-comment that you have done on someone's MCQ post.
- You will lose 10 score when a user flag your Calculation post.
- You will lose 2 score when a user flag your comment that you have done on someone's Calculation post.
- You will lose 1 score when a user flag your sub-comment that you have done on someone's Calculation post.
Levels
When you get registered into Sookshmas, you will be in Level 1. Based on your score and mentor occurence, you will be promoted to the next higher level and this continues till you reaches Level 16.
Mentor Selection
Every week the top highest scorers are selected for the particular Account tag. Those top scorers get the Mentor request and if they accept, they will be considered as the Mentor. This process will be done only when the same Account tag is used by 50 users.
1 Mentor is selected for 50 users having same account tag. Suppose there are 500 users, in that 400 users are having CBSE tag and 100 users are having Karnataka State Board tag as their Account tag, then the no.of mentors required for CBSE tag are 8 and Karnataka State Board tag are 2.
Promotion
For every level there is a fixed score and mentor occurrence. If you satisfy the score and mentor occurrence for that particular level, you will get the Promotion request and if you accept, you will be promoted to the next level.For example, if you satisfy the score and mentor occurrence for Level 1 in the tag CBSE, you will be promoted to the Level 2. In the same way, you can get promoted to the next levels based on the score and mentor occurrence.
NOTE: The count of mentor occurrence is considered for the same tag. If you change the tag, that mentor count is considered separately.
Suppose the mentor occurrence to get promote to the Level 2 is 2. If you became mentor for tag CBSE for the first time and for the second time for tag Karnataka State Board, then that mentor count is not counted as 2. You have to satisfy the mentor count 2 either for the same tag CBSE or Karnataka State Board.
| Existing Level | Promoted Level | Score | Mentor Count |
|---|---|---|---|
| Level 1 | Level 2 | 2K | 0 |
| Level 2 | Level 3 | 3K | 1 |
| Level 3 | Level 4 | 5K | 2 |
| Level 4 | Level 5 | 8K | 5 |
| Level 5 | Level 6 | 12K | 10 |
| Level 6 | Level 7 | 16K | 10 |
| Level 7 | Level 8 | 20K | 10 |
| Level 8 | Level 9 | 25K | 10 |
| Level 9 | Level 10 | 30K | 10 |
| Level 10 | Level 11 | 35K | 10 |
| Level 11 | Level 12 | 40K | 10 |
| Level 12 | Level 13 | 50K | 10 |
| Level 13 | Level 14 | 60K | 10 |
| Level 14 | Level 15 | 80K | 10 |
| Level 15 | Level 16 | 100K | 10 |
Depromotion
Like the Mentor and Promotion, we have the conditions for warning, depromotion and deactivation.If you get more flags than claps ,you will fall under warning criteria. Suppose if you are in Level 2 and your percentage ratio of flags over claps is >=30% or <=50%, you will get the warning. You can continue your activities to increase your claps and score.
If you don?t recover your score and getting more flags and if you fall under the depromotion conditions, you will get the depromotion warning and you will be depromoted by the next two higher level users.
For example, if you are in Level 2 and your percentage ratio of flags over claps is >=50% or <=70%, then 1 user from Level 3 and 1 user from Level 4,having same account tag as yours can depromote you to Level 1. Now you have to continue your activities from the Level 1 .
| Existing Level | Depromoted Level | Warning (%) | Depromotion (%) |
|---|---|---|---|
| Level 2 | Level 1 | 30 | 50 |
| Level 3 | Level 2 | 28 | 43 |
| Level 4 | Level 3 | 25 | 38 |
| Level 5 | Level 4 | 25 | 38 |
| Level 6 | Level 5 | 22 | 33 |
| Level 7 | Level 6 | 22 | 33 |
| Level 8 | Level 7 | 22 | 33 |
| Level 9 | Level 8 | 20 | 30 |
| Level 10 | Level 9 | 20 | 30 |
| Level 11 | Level 10 | 20 | 30 |
| Level 12 | Level 11 | 15 | 24 |
| Level 13 | Level 12 | 15 | 24 |
| Level 14 | Level 13 | 15 | 24 |
| Level 15 | Level 14 | 10 | 17 |
| Level 16 | Level 15 | 10 | 17 |
Deactivation
If you fall under the deactivation conditions, you will get the deactivation warning and you will be deactivated by the next three higher level users.For example, if you are in Level 2 and your percentage ratio of flags over claps is >70%, then 1 user from Level 3, 1 user from Level 4 and 1 user from Level 5,having same account tag as yours can deactivate you. Once you have deactivated, you cannot continue your activities in Sookshmas.
| Level | Deactivation (%) |
|---|---|
| Level 1 | 70 |
| Level 2 | 70 |
| Level 3 | 58 |
| Level 4 | 51 |
| Level 5 | 51 |
| Level 6 | 44 |
| Level 7 | 44 |
| Level 8 | 44 |
| Level 9 | 40 |
| Level 10 | 40 |
| Level 11 | 40 |
| Level 12 | 33 |
| Level 13 | 33 |
| Level 14 | 33 |
| Level 15 | 24 |
| Level 16 | 24 |
Rank Powers
Reply DeletionThe reply can be deleted by the next one higher level.
For example: If you are in Level 1, only you or Level 2 user can delete your reply.
Comment DeletionThe comment can be deleted by the next second higher level.
For example: If you are in Level 1, only you or Level 3 user can delete your comment.
Post DeletionThe post can be deleted by the next third higher level.
For example: If you are in Level 1, only you or Level 4 user can delete your post.
Play Quiz
Play Quiz is the area where you can test your skills and prepare for your competitive exams by playing Quiz.
Steps to play the Quiz:
- Click on the Play Quiz at the header.
- Set the tag which you need to play either by entering or by selecting from the tag combination below.(Tag is optional).
- Select the number of questions and click on Start Quiz.
More settings
You can set the time, Positive marks and Negative marks while playing Quiz. By default no time is set and maximum allowable time is 999 min, Positive and Negative marks will be 1 and 0 respectively. Positive marks and Negative marks should be less than 10 and Negative marks should be less than Positive marks. After completing Quiz, your quiz score will be based on the marks which you had set.
You can track your quiz score in Play Quiz Analytics.Also, you can check the correct and wrong answers by clicking on tags in Play Quiz Analytics.
Challenge your friend
You can challenge your friend to play the same quiz.
Steps to Challenge your friend:
- Click on the Challenge your friend in Quiz result page.
- Challenge either by email-id or by selecting from the followers.Click on Send.
Beyond Knowing Subscription
Sookshmas Beyond Knowing Subscription aims at the development of students into professionals through exposure to industry tools and intense competitive environment which shapes the student's mind in a right way and makes them industry ready.
Beyond Knowing Subscription Plans:
Sookshmas Beyond Knowing Subscription provides 4 different plans for students:
Features for Beyond Knowing Subscription
- Gamified self-learning with everyday revision and practice
- Daily,Weekly,Monthly and many more learning encouragement rewards
- Mentorship opportunity with 2x learning and monthly scholarship
- Self-Learning and Mentor certificates for your profile building
Steps to subscribe for Sookshmas Beyond Knowing
To subscribe for any plan, first login to your account then click Beyond Knowing at the header menu. Click on Subscribe tab and then click Subscribe button. You will be redirected to the Subscribe page.
- Select your plan.
- Enter the referral code if present to get additional discount to the plan which you need to subscribe.
- Read the Terms and Conditions and agree to the Terms and Conditions of the plan which you need to subscribe.
- Click on Subscribe button. Select the payment method. Enter the details and Click Pay.
Steps to renew:
To renew your plan, first login to your account then click Beyond Knowing at the header menu. Click on Subscribe tab and then click Renew button.
- Click on Renew button.
- Select the payment method. Enter the details and Click Pay.
Invoice
You can check your invoice by clicking on Invoice button in the Subscribe page.
To Unsubscribe
- Click on Unsubscribe button in the Subscribe page.
- It will ask you for the confirmation. Click "Yes" to unsubscribe.
Test Series
Sookshmas Test Series is an ideal way to test your preparation and get ready to face competitive exams.
Test Series Store
It is a section where you can get the most recent and popular test series. You can also search test series by category, test series name and author of the test series.
Steps to Buy Test Series
To buy test series, first login to your account then click Test Series at the header menu. You will be redirected to the Test Series Store.
- Search your required test series. Hover/Click on the test series block and click icon.
- Click on Buy Now button.
- Select the payment method. Enter the details and Click Pay.
My Collection
It is a section where you can get all the test series which you have purchased.
Steps to attend Test Series
- Go to My Collection.
- Hover/Click on the test series block which you want to attend and click icon.
- Click on Attend Now button of the test paper which you want to attend.
Get Posting Access
It is a section where you need to proceed with the payment to get an access to post unlimited test series.
Steps to get posting access
- Login to your account. Click on Test Series at the header menu and then click Get Posting access menu in the sidebar.
- Enter the referral code if present to get additional discount.
- Read the Terms and Conditions and agree to it.Click on Proceed button.
- Select the payment method. Enter all the details and click on Pay button.
My Test Series
Here you will get all the test series which you have created.
Following actions can be performed under My Test Series.
Create Test Series
To create test series click on Create button at the right side of the page. Enter all the fields and click Create button.
Edit Test Series
To edit test series click on the test series title of the particular test series. Click on icon at the right side of the block. Edit the fields and click Update button.
or
To edit test series click on icon at the bottom of the test series block. Edit the fields and click Update button.
Delete Test Series
To delete test series click on the test series title of the particular test series. Click on icon at the right side of the block. It will ask you for confirmation. Click Yes.
or
To delete test series click on icon at the bottom of the test series block. It will ask you for confirmation. Click Yes.
Create Test Paper
To create test paper click on the test series title of the particular test series.Enter the test paper title and other fields in the block provided below and click Add Paper button.
Edit Test Paper
To edit test paper click on the test series title of the particular test series. Click on icon of the particular test paper. Edit the fields and click Update button.
Delete Test Paper
To delete test paper click on the test series title of the particular test series. Click on icon of the particular test paper. It will ask you for confirmation. Click Yes.
Add questions to the test paper
To add questions to the test paper click on the test series title of the particular test series. Click Add Que button of the test paper which you want to add. Enter the questions, tags, options, correct answer, difficulty level, description and then click Submit button.
Edit questions of test paper
To edit questions of the test paper click on the test series title of the particular test series. Click on Questions Posted link in the the test paper block which you want to edit. Click on icon of the particular question which you want to edit at the right corner in the modal box.Edit the questions, tags, options, correct answer, difficulty level, description and then click Update button.
Publish Test Paper
To publish the test paper click on the test series title of the particular test series. Click on Publish button at the bottom of the particular test paper which you want to publish. It will ask you for confirmation. Click Yes.
Publish Test Series
To publish the test series click on Publish button at the bottom of the particular test series block. It will ask you for confirmation. Click Yes.
NOTE: Test series can be published only when you have published atleast one test paper. Once test series is published, you can publish only the remaining test papers.
Unpublish Test Series
To unpublish the test series select Published from the filter provided at the right side of the page. Click on Unpublish button at the bottom of the particular test series block. It will ask you for confirmation. Click Yes.
Republish the Unpublished Test Series
To publish the test series again which is already unpublished select Unpublished from the filter provided at the right side of the page. Click on Publish button at the bottom of the particular test series block. It will ask you for confirmation. Click Yes.
NOTE: You can edit/delete the test series/test paper only before publishing it.
Analytics
Attended
It is a section where you can track the records of the test series which you have attended. By using filters you can filter the data.
Sales
It is a section where you can track your test series purchase history .
Invoices
Test Series
It is a section where you can check your purchased test series invoices.
Posting Access
It is a section where you can check your invoice of posting test series access.
Videos
Sookshmas Videos allows you to take various concept/topic based videos from competitive and engineering domains.
Steps to watch Videos
- Login to your account, click on
 Ed Tools, followed by Videos.
 - Choose the video from the list and click on the specific video.
- Add the video to My Collections and watch it anytime.
My Collection
In this section you can find all the shortlisted videos which have been added by you to your collections.
Assignments
Sookshmas Assignments tool allows every teacher, educator or institute to create their subjective question's tests or assignments. And students who follow teachers/educators/institutes accounts will get those assignments, where they can take up that and submit it within the time mentioned. Submitted assignments will be visible for both students and educators anytime.
Steps to post an Assignment
- Login to your account, click on Ed Tools, followed by Assignments.
- Click on Post Assignment (only teachers/educators/institutes will have this option).
- Enter the title of assignment and mention the tags (subject/course tag).
E.g.: Engineering-CS, Java - Set marks for the particular assignment.
- Mention the last date and time of submission for the assignment.
- Enter the description with respect to the assignment and click on Post Assignment.
The submitted assignments will be visible under the specific assignment and submissions will not be accepted after the date expires.
Quiz Set
Sookshmas Quiz set is specially designed for the teachers/educators/institutes, where they can create a set of MCQs and can share links to your followers or students.
Steps to create Quiz Set
- Login to your account (only teachers/educators/institutes will have this option) and click on Ed Tools, followed by Quiz Set.
- Click on Create button.
- Fill the required data and submit by clicking on the Create button.
Note: Share Link will be available only after posting all the MCQs of particular Quiz Set as mentioned.
Details you should add while creating quiz
- Enter the Quiz Set name.
E.g.1: C Technical Aptitude Quiz, Java Collections Questions
E.g.2: GS Unit-1 Quiz - Enter the required tags (subject/course).
E.g.1: Engineering-CS, Java, Sem-IV
E.g.2: C-Language, Aptitude, Technical Interview
E.g.3: Oneday Exams-Medium English, Maths, Speed Time and Distance - Choose the number of questions you need in your quiz from the options provided. (Min 10 and Max 100 questions)
- Enter duration of Quiz. Enter duration according to the number of questions.
E.g.: 10 (i.e., 10 minutes to solve 10 questions) - Set positive marks for individual question (value should be greater than 0).
- Set negative marks for individual question.
- Add description with respect to the quiz set you create. (The description should be related to the Quiz set you create)
E.g.: If you are creating Quiz Set on C- technical aptitude, then include concepts you are using, terms and short description on that, etc. - Select the start date from the given calendar and choose the time by which the quiz will be available.
E.g.: 2020-12-25 12:30 - Select the end date from the given calendar and choose the time till which the quiz will be available.
E.g.: 2020-12-26 13:30 - Enter number of days after which the result will be visible for the users (Set 0 to allow the user to view the result immediately).
E.g.: 2 days, here results will be visible for the users after two days the quiz has been created.
Hint: Set to 0 if you do not want to use the same quiz to any other set of students. - Enter the number of days to make questions public from Quiz Set.
E.g.: 2 days, here MCQs by default will be updated to public after 2 days and will be available to read, comment and share by any user.
My Quiz Set
In this section you will find all the quiz sets you have created and can edit and delete quiz sets anytime.
Quiz Set Results
In this section, you can find the report of students who have attended your quiz set. Enter the tag of a specific quiz set, mention the date range and click on the Filter button to check the results.